· 6 min read
Florian Mladitsch

At work and privately I am using the library pmndrs/zustand for state-management in my ReactJS applications. Zustand is a rather un-opinionated library giving the developer the freedom to implement app-specific requirements in multiple ways. While working with this library a few coding patterns and best practices emerged that worked well for my projects.

Keep in mind that this is just loose and subjective collection.

Define the state via interface or types

The documentation starts with code examples in pure JavaScript but Typescript is supported as well and a guide for it can be found here.

As described in this guide the store can be typed by declaring an interface.

import { create } from "zustand";

export interface ExampleStoreState {
count: number;
}

export const useExampleStore = create<ExampleStoreState>()(() => ({
count: 0,
}));

And usage in a component:

import { ExampleStoreState, useExampleStore } from "./stores/example.store.ts";

function App() {
const count = useExampleStore((state: ExampleStoreState) => state.count);

const handleUpdate = () => {
useExampleStore.setState((state: ExampleStoreState) => {
return {
count: state.count + 1,
};
});
};

return (
<>
<div>
<button onClick={handleUpdate}>Click Me</button>
</div>
<div>{count}</div>
</>
);
}

export default App;

The advantage of typing your store is that it makes refactoring easier and catches errors during development with the help of static code analysis.

Adding the type (state: ExampleStoreState) in the component might be optional but I like having the types explicitly in my code. Additionally, it makes it easier for me to jump to the definition of the store state type.

Opposed to the guide of the documentation I like to use a type definition instead of an interface.

export type ExampleStoreState = {
count: number;
};

export const useExampleStore = create<ExampleStoreState>()(() => ({
count: 0,
}));

For simple stores it does not make a difference which variant you use but for my other best practices I'm building upon Typescript types handling.

Split attributes and methods

Building upon the previous example we might add a feature which increases the counter by 1.

The typical approach for this is to add a method to the store.

export type ExampleStoreState = {
count: number;
increaseCount: () => void;
};

export const useExampleStore = create<ExampleStoreState>()((set) => ({
count: 0,
increaseCount: () => {
set((state: ExampleStoreState) => ({ count: state.count + 1 }));
},
}));

With this setup the type ExampleStoreState ties together the data and behavior of the store. For simple stores this is fine. But when the store gets more complex with a larger state and many methods I like to split the data and methods.

type ExampleStoreStateData = {
count: number;
};

type ExampleStoreStateMethods = {
increaseCount: () => void;
};

export type ExampleStoreState = ExampleStoreStateData &
ExampleStoreStateMethods;

export const useExampleStore = create<ExampleStoreState>()((set) => ({
count: 0,
increaseCount: () => {
set((state: ExampleStoreState) => ({ count: state.count + 1 }));
},
}));

Splitting it this way gives introduces a bit more structure and helps with my other best practices.

Using types instead of interfaces allows us to easily join the data and methods into the complete ExampleStoreState. The same could be done with interfaces and inheritance but I don't think that the semantics of inheritance is a good fit.

Resetting the store state

Sometimes I need to restore the initial empty state of the store. This might happen during runtime, but usually I want to reset the state before each test in my automated test suite.

The official documentation even has a page for this here.

For resetting the state I define the initial state outside and have a method for initialization.

type ExampleStoreStateData = {
count: number;
};

const initialState: ExampleStoreStateData = {
count: 0,
};

type ExampleStoreStateMethods = {
increaseCount: () => void;
init: () => void;
};

export type ExampleStoreState = ExampleStoreStateData &
ExampleStoreStateMethods;

export const useExampleStore = create<ExampleStoreState>()((set) => ({
...initialState,
increaseCount: () => {
set((state: ExampleStoreState) => ({ count: state.count + 1 }));
},
init: () => {
set(structuredClone(initialState)); // set({...initialSate}) works as well
},
}));

This approach builds upon the previous steps of splitting data and behavior. We only need to initialize ExampleStoreStateData and can leave ExampleStoreStateMethods alone.

Use custom hooks to access derived data

Sometimes the data in my store has some dependencies and relations to each other because of the application business logic.

For example my store might contain a larger list of data entries and smaller list of filtered ids meaning that somewhere in the application a filtered list of my entries are displayed.

interface DataModel {
id: number;
name: string;
}

type ExampleStoreStateData = {
dataSource: DataModel[];
filteredIds: number[]; // list of filtered ids to display
};

const initialState: ExampleStoreStateData = {
dataSource: [
{
id: 1,
name: "First Entry",
},
{
id: 2,
name: "Second Entry",
},
{
id: 3,
name: "Third Entry",
},
{
id: 4,
name: "Fourth Entry",
},
],
filteredIds: [],
};

type ExampleStoreStateMethods = {
init: () => void;
};

export type ExampleStoreState = ExampleStoreStateData &
ExampleStoreStateMethods;

export const useExampleStore = create<ExampleStoreState>()((set) => ({
...initialState,
init: () => {
set(structuredClone(initialState));
},
}));

One or more components might need the complete dataSource (e.g. the filter selection component) and one or more components only needs the filtered list (e.g. display components).

The two most obvious solutions to this is either to implement filtering in your component resulting in duplicate code or to implement it in your ExampleStoreMethods resulting having business logic in your state.

filter in component
function App() {
const dataSource = useExampleStore(
(state: ExampleStoreState) => state.dataSource,
);
const filteredIds = useExampleStore(
(state: ExampleStoreState) => state.filteredIds,
);

const filteredData = dataSource.filter((entry) =>
filteredIds.includes(entry.id),
);
return (
<>
<div>
<ul>
{filteredData.map((entry) => (
<li key={entry.id}>{entry.name}</li>
))}
</ul>
</div>
</>
);
}
filter in store
export const useExampleStore = create<ExampleStoreState>()((set, get) => ({
...initialState,
init: () => {
set(structuredClone(initialState));
},
filteredData: () => {
const { dataSource, filteredIds } = get();

return dataSource.filter((entry) => filteredIds.includes(entry.id));
},
}));

function App() {
const filteredData = useExampleStore(
(state: ExampleStoreState) => state.filteredData(),
);

return (
<>
<div>
<ul>
{filteredData.map((entry) => (
<li key={entry.id}>{entry.name}</li>
))}
</ul>
</div>
</>
);
}

What I like to do is to implement a custom hook which does the filtering and just use the hook inside the components that require the filtered data.

// e.g. in example.store.hooks.ts
export function useFilteredData() {
const dataSource = useExampleStore(
(state: ExampleStoreState) => state.dataSource,
);
const filteredIds = useExampleStore(
(state: ExampleStoreState) => state.filteredIds,
);

return dataSource.filter((entry) => filteredIds.includes(entry.id));
}

// App.tsx
function App() {
const filteredData = useFilteredData();

return (
<>
<div>
<ul>
{filteredData.map((entry) => (
<li key={entry.id}>{entry.name}</li>
))}
</ul>
</div>
</>
);
}

It might not make sense to use custom hooks for everything, but I like the clarity and separation of concerns of this approach.

Miscellaneous Stuff

Some other smaller tips are

  • Don't put everything into one large store, split accordingly to application logic
  • updating the state with useExampleStore.setState({...}) is often easier than implementing an update method on the store itself

· 7 min read
Florian Mladitsch

Designing REST-APIs

Over the years there has been many approaches to expose your service/business-layer to the outside world in a (programming) language agnostic way via APIs. The APIs could be as low-level as direct TCP/IP socket connections or more standardized (and complex) as the SOAP standard. But with on-going rise of the web the most common API approach you will find is that of a REST-API. Most single page application are accessing the backend services via REST-APIs but they are also used for 'standalone' services like weather data, github, or even for a database (CouchDB).

But one disadvantage of building a REST-API is that the consumer must know all the endpoints, which methods are allowed on them, and what data structure the API expects. To get this information you have more or less three possibilities:

  1. You wrote the API yourself
  2. You ask the person who wrote it
  3. You resort to the documentation

But when multiple people are relying on the REST-API the first two options are no longer working so having a documentation is the only solution. But relying on documentation brings its own problems along, for example being out of date, simply wrong or incomplete. Additionally on how the documentation is presented might vary from API to API.

OpenAPI Initiative (OAI)

The OpenAPI Initiative defines a specification on how REST-APIs are described and documented as described on their about page:

https://www.openapis.org/about

The OpenAPI Initiative (OAI) was created by a consortium of forward-looking industry experts who recognize the immense value of standardizing on how REST APIs are described. As an open governance structure under the Linux Foundation, the OAI is focused on creating, evolving and promoting a vendor neutral description format. SmartBear Software is donating the Swagger Specification directly to the OAI as the basis of this Open Specification.

Before the OAI there was (and still is) the tool ecosystem Swagger (https://swagger.io). Swagger had its own specification language to specify and document REST-APIs and additionally tooling to generate documentation pages and even code stubs. Swagger was taken into the OAI and it's Swagger specification 2.0 was renamed to the OpenAPI Specification. By now the OpenAPI Specification is at version 3.

The cool thing about having a standard language on how to describe the API is that it is possible to provide standardized/generated documentation and generate code for the client and server. Because I have never tried the complete workflow (write specification -> generate code -> implement business logic) with the OpenAPI Specification I wanted to do a small example project with this approach.

Example 'Project Management App'

For the small example project I'm doing a shitty little project management application with following features:

  • Create projects with name and deadline
  • Add tasks to a project
  • Delete tasks from a project
  • Set tasks to finished

Writing the API specification on SwaggerHub

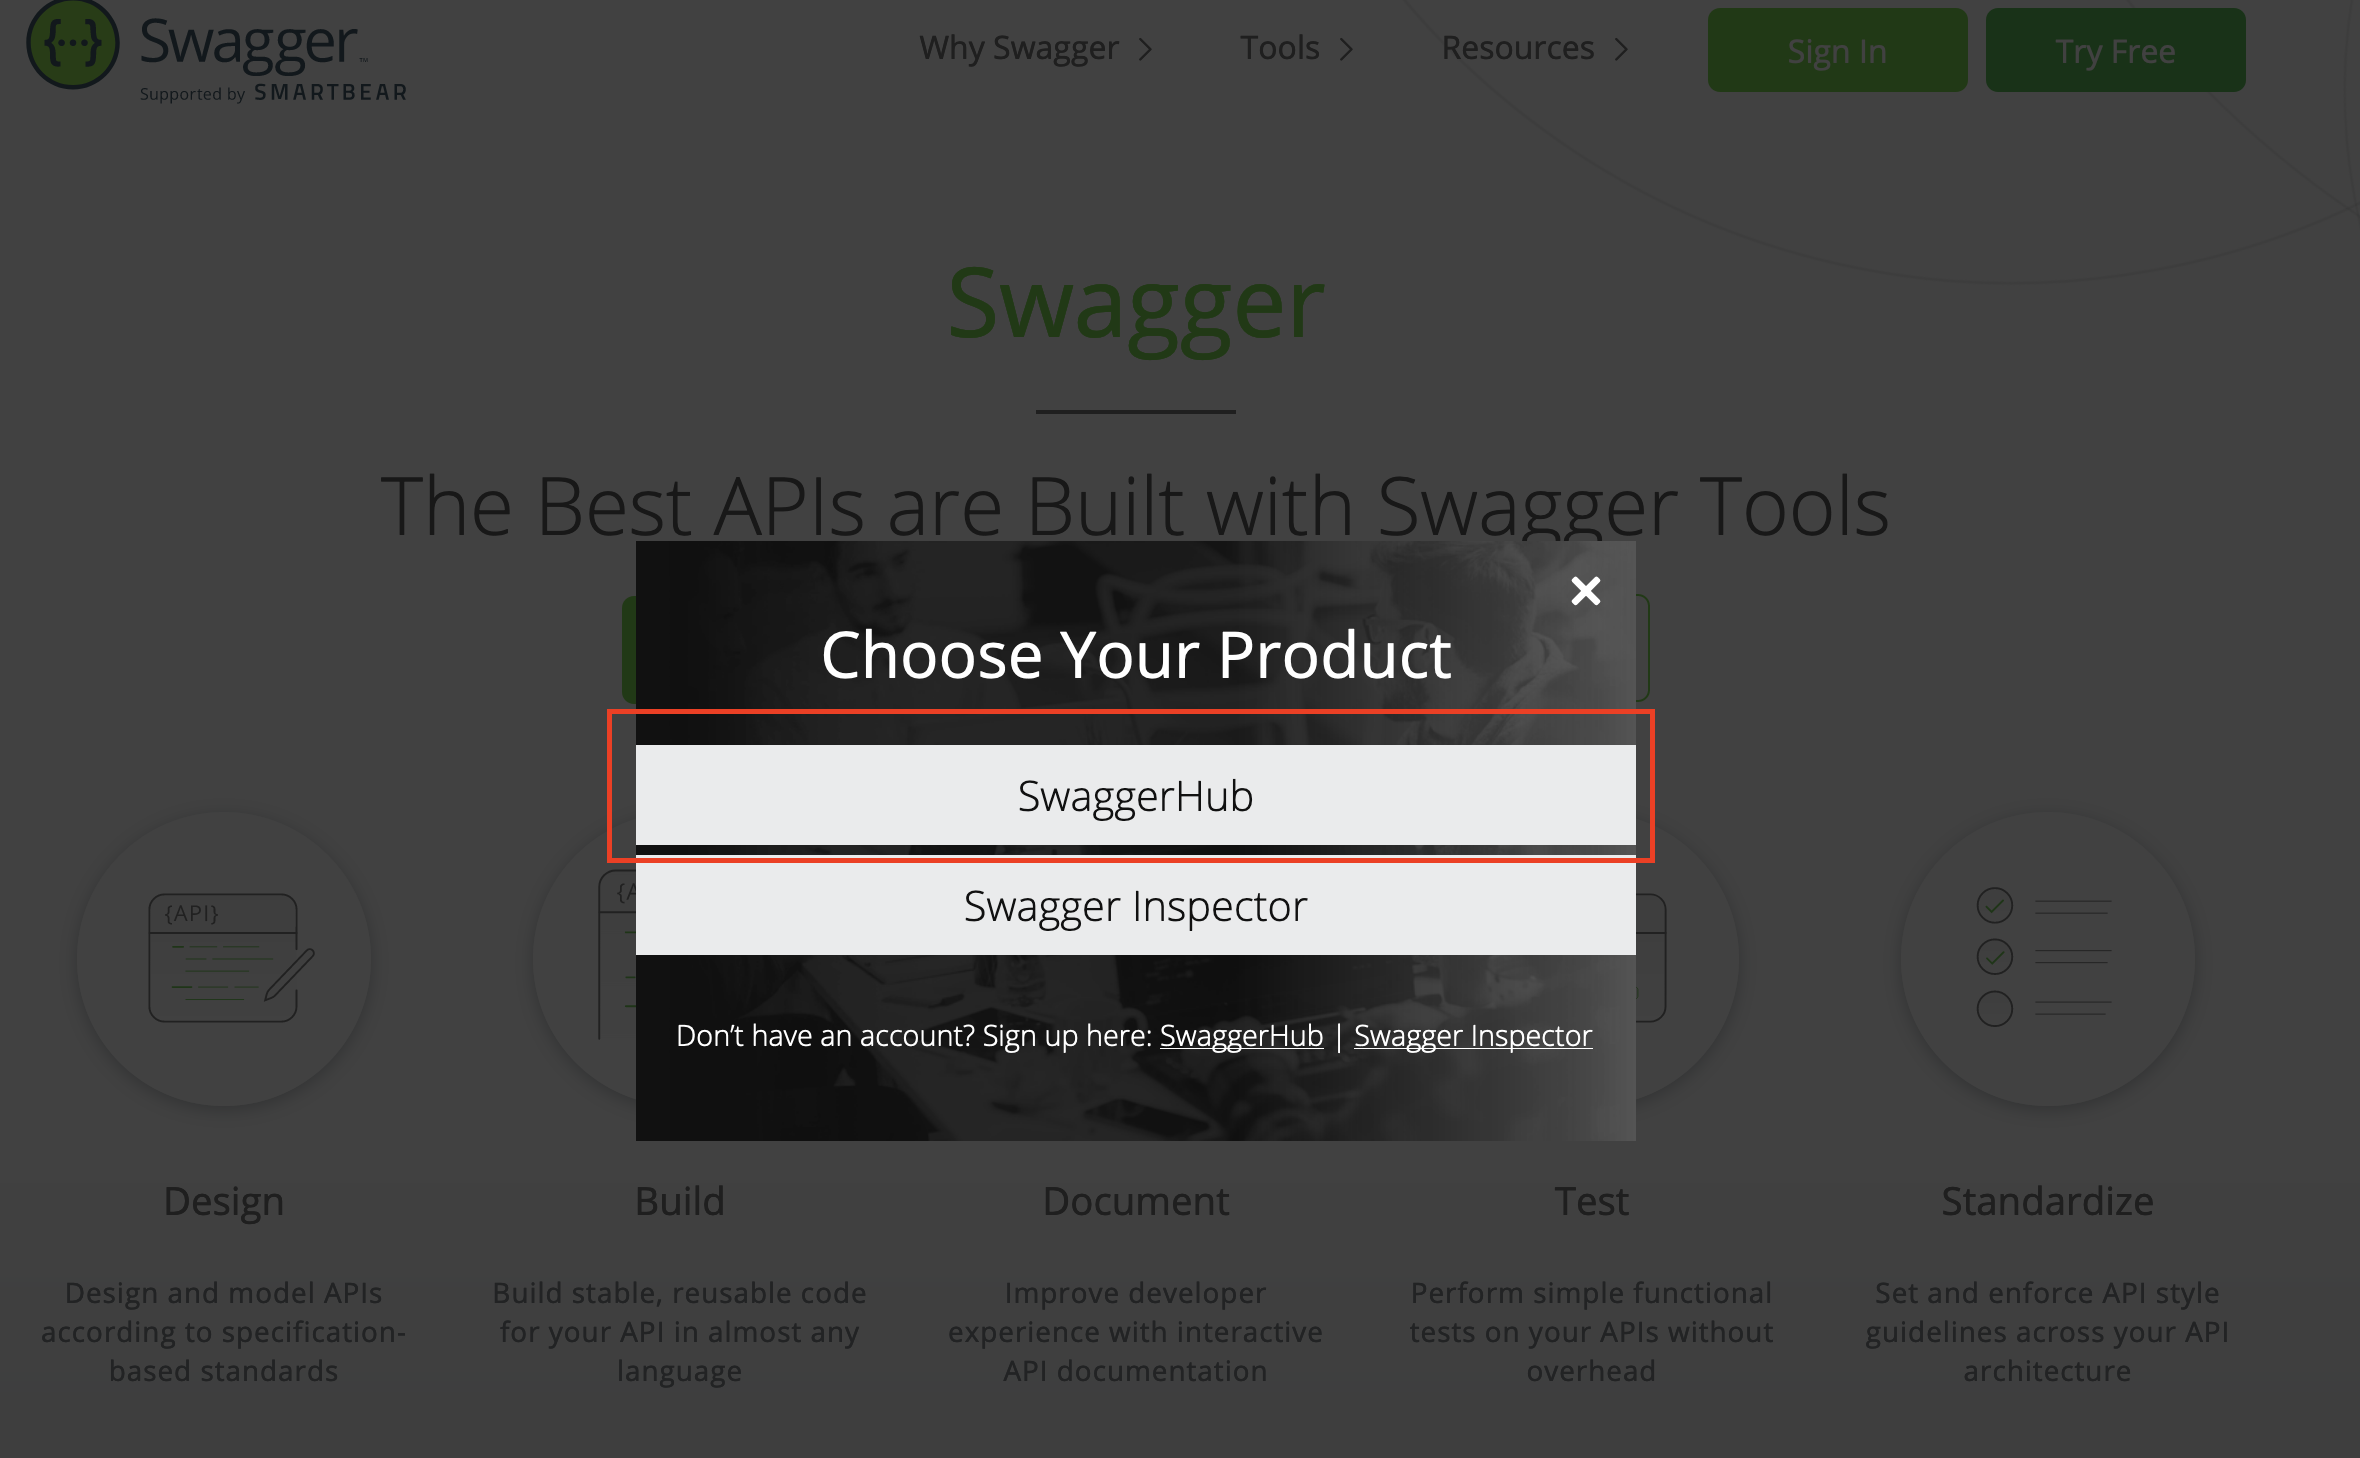
The first step is to visit https://swagger.io and sign in into SwaggerHub.

SwaggerHub Login

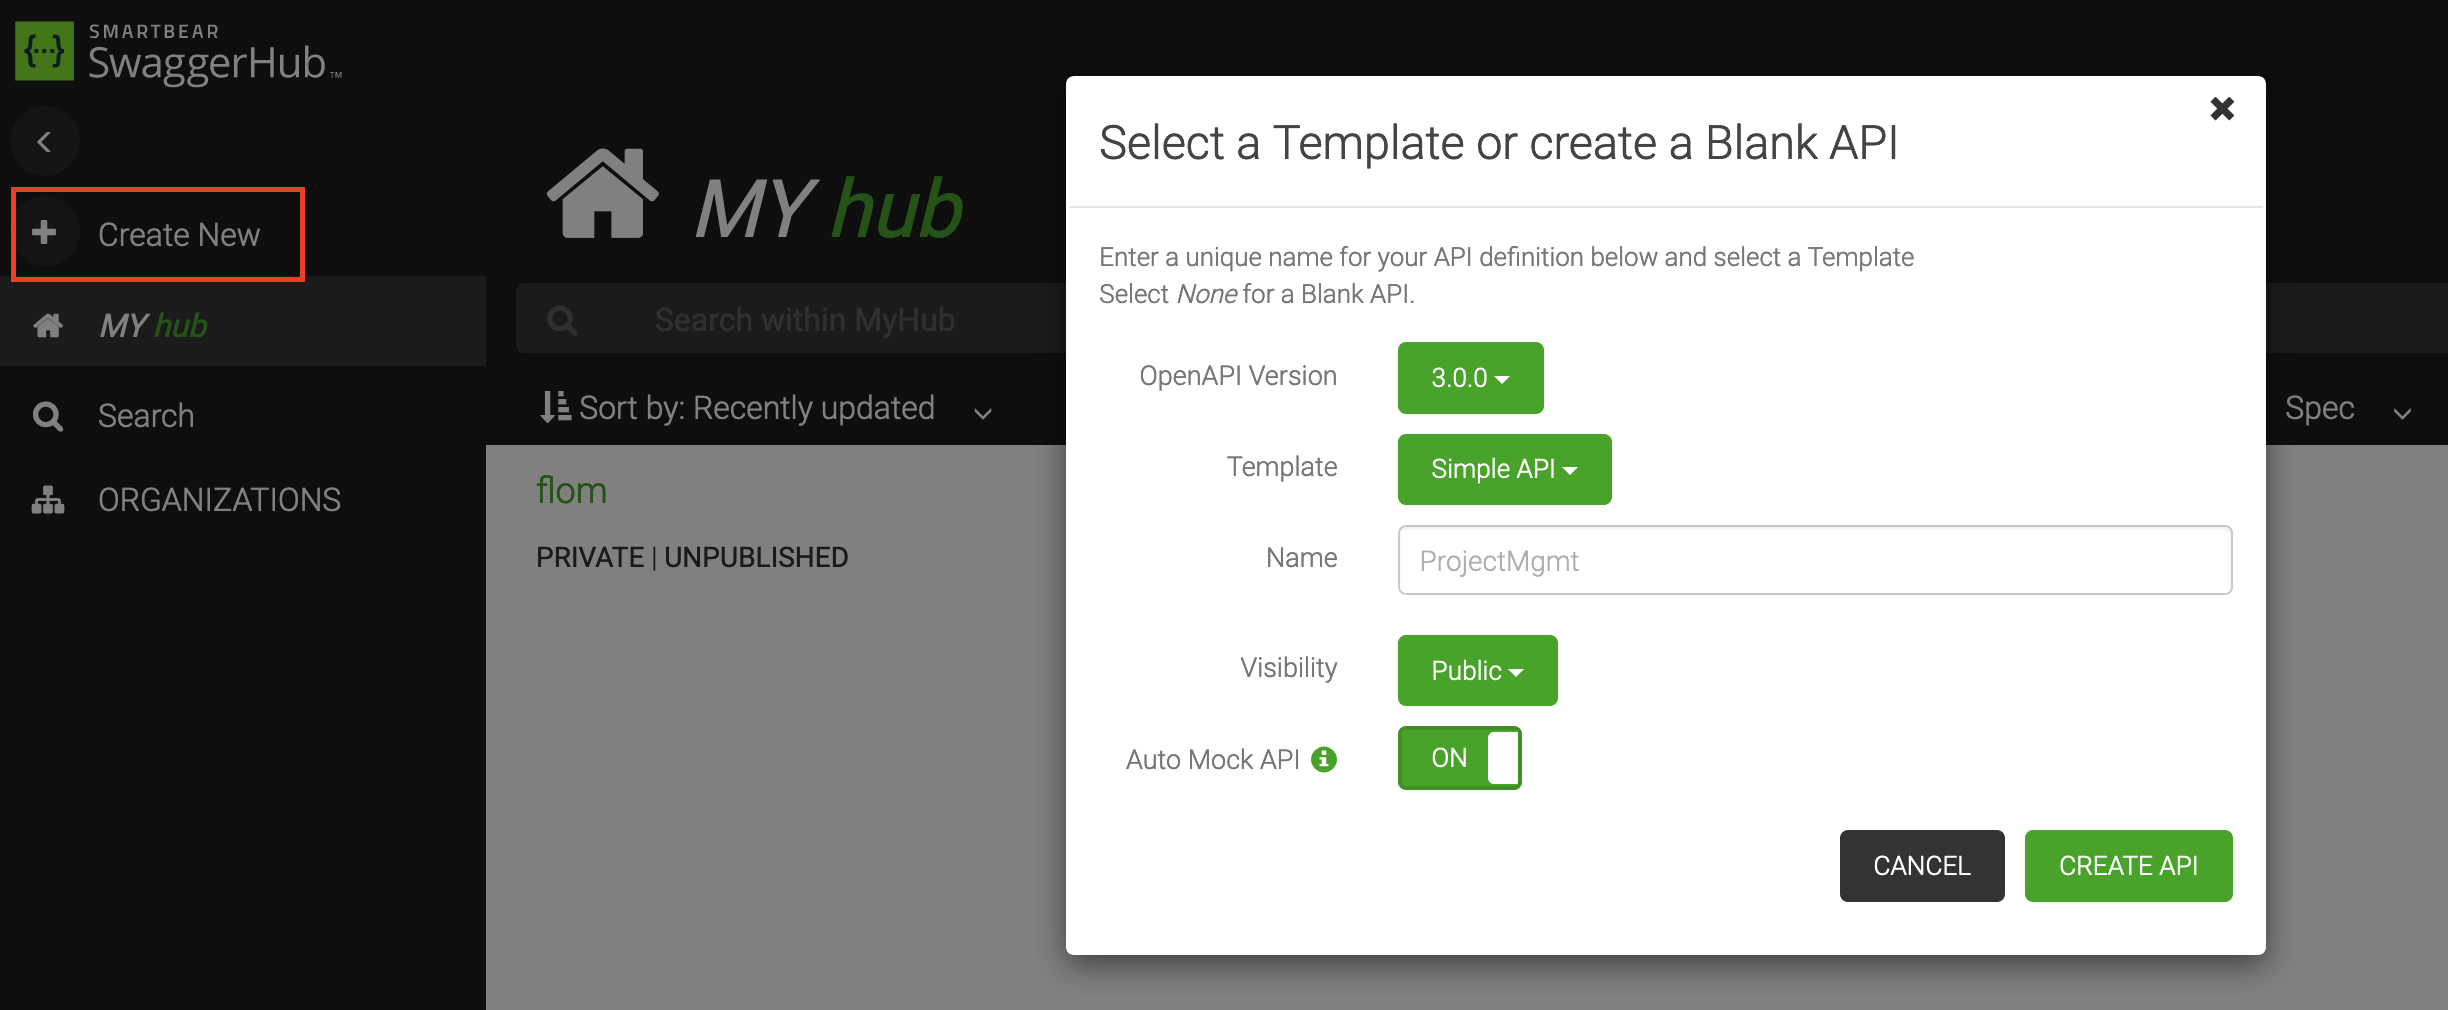
After the login you will see your personal Hub where you can create a new API:

Hub Create API

With the option Auto Mock API Swagger will generate static mock data based on your defined endpoints and data structures. Using Simple API as a template gives a quick starting point for the API without having to know the OpenAPI specification.

To get a good overview of the specification language you can visit OpenAPI 3.0 Tutorial. For quickly looking up the syntax of single elements the Specification is a good starting point.

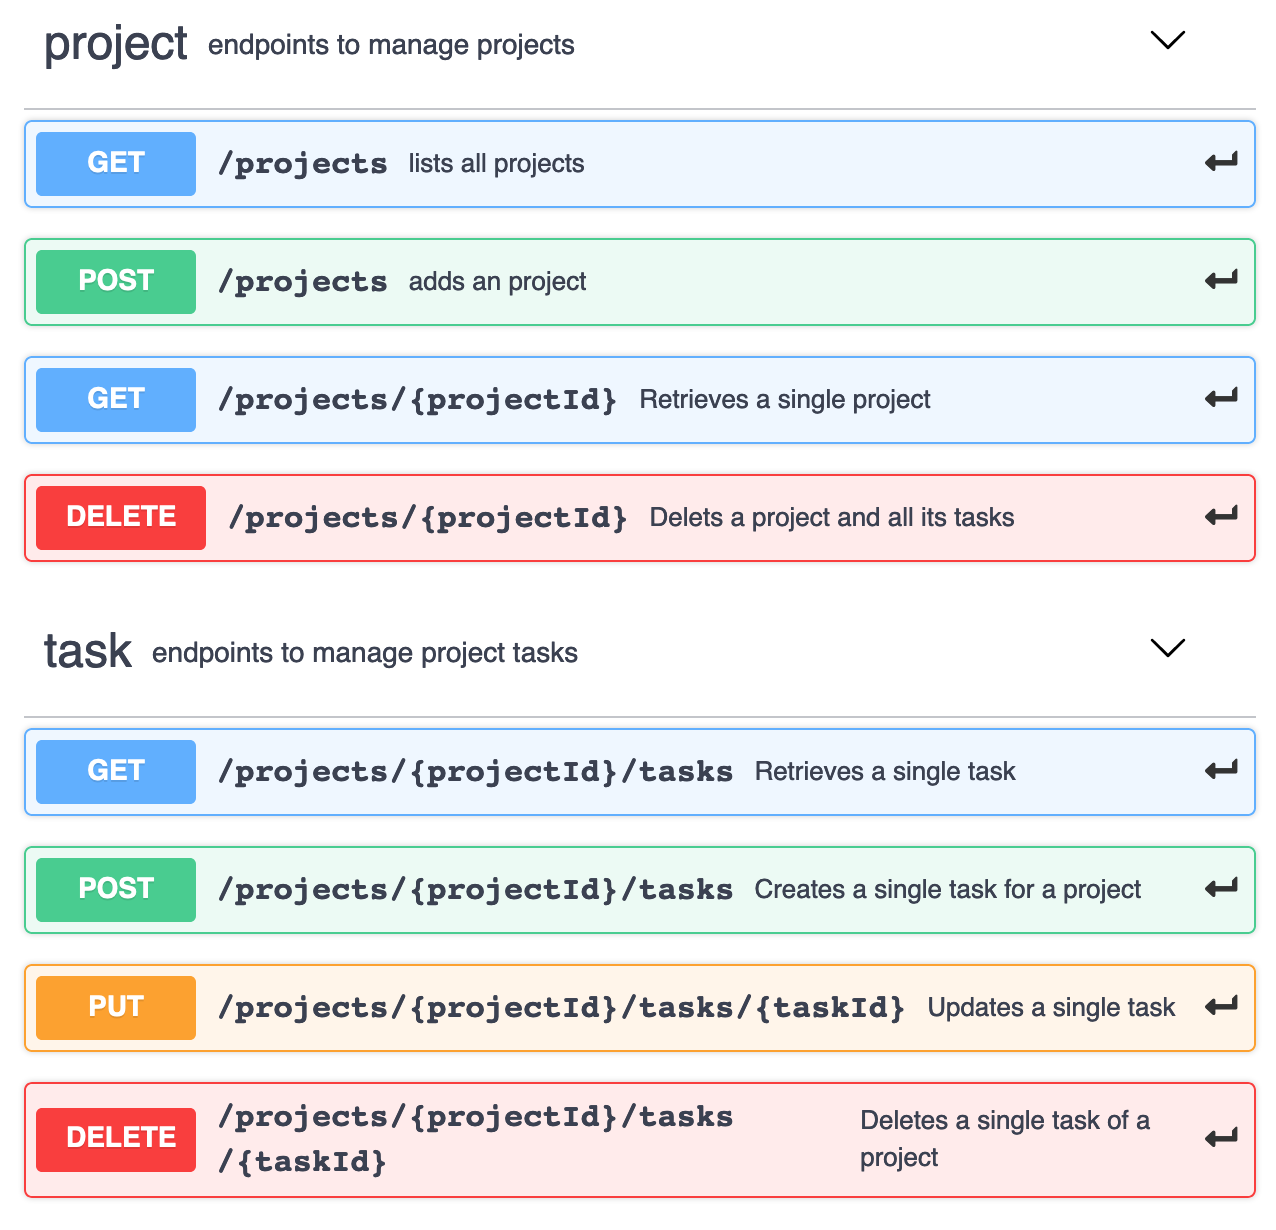
After adding the endpoints for my Project Management App my endpoints look like this:

Project Management API

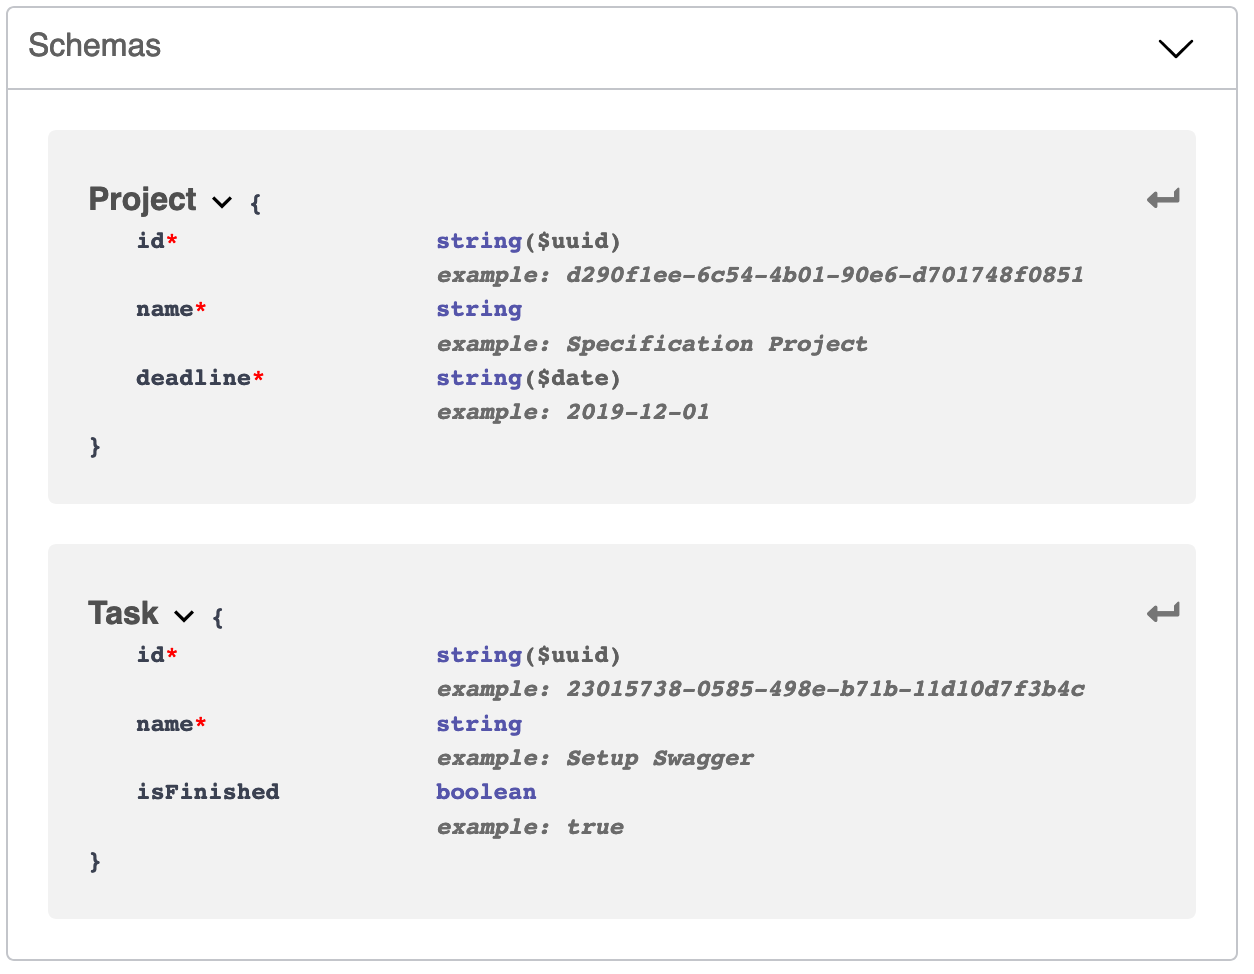
And the data structures are as following:

Datastructures

The same example data you enter into your specification will be used for the Auto Mock API. If enabled, the Mock API is available under https://virtserver.swaggerhub.com/[username]/[ProjectName]/[version]/. For the client side code generation this url is taken as well as a fallback URL if you don't provide one yourself.

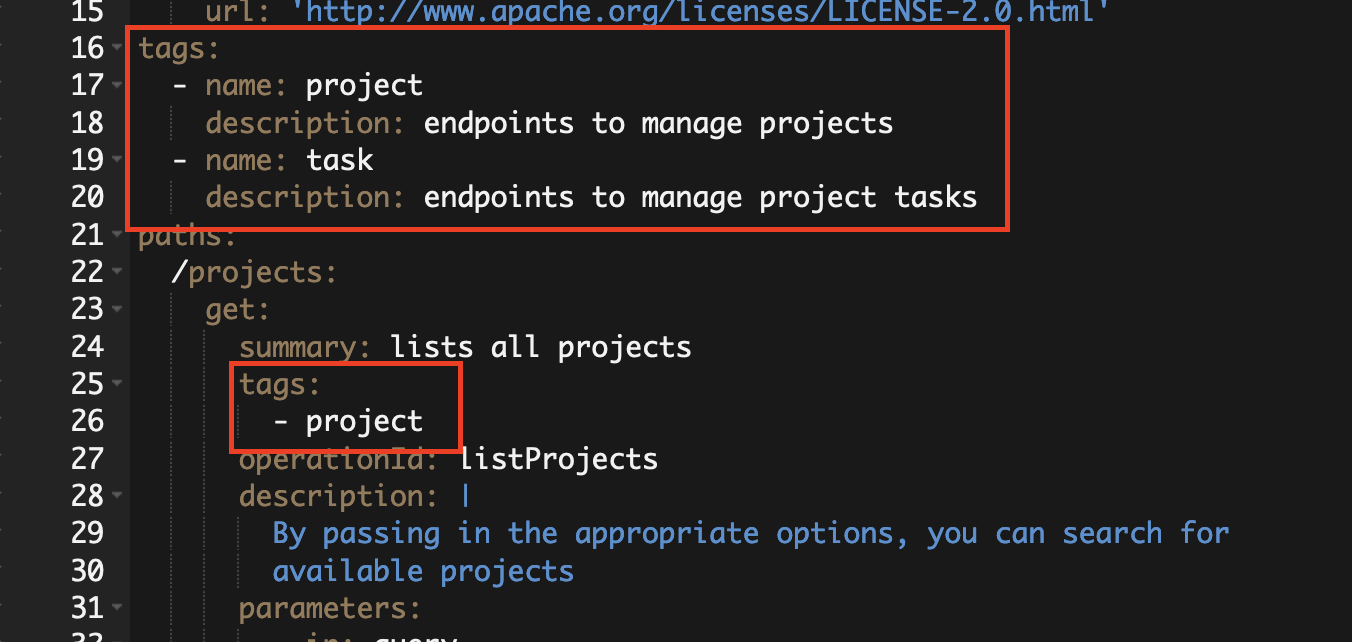
Before generating the code for client and server you should give a quick glance at the tags you defined in your specification.

Specification Tags

For the generated documentation page all they seem to do is put your endpoints into sections (in my case project and task). But later for code generation the generator will put the sections/tags into different files/classes. For Angular this ends up being two services (project.service.ts and task.service.ts) and for the Python Flask server code two files are generated (project_controller.py and task_controller.py).

Another important setting is the operationId:

Specification Operation ID

The operationId is used to generate the specific method names for your client/server code.

Downloading client code for Angular

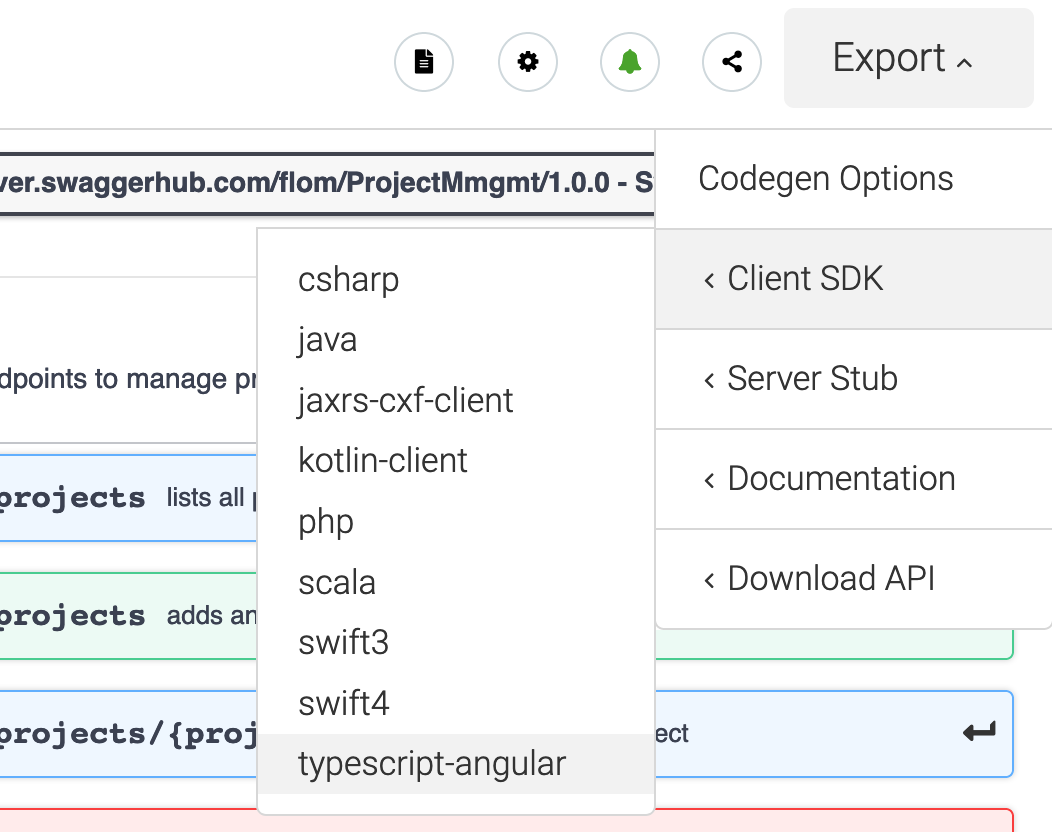
After the specification is done you can now generate the code for your front- and backend. For angular the process looks like this:

Download code via Export -> ClientSDK -> typescript-angular

Download Angular Client Code

In my case the files look like this:

api
+-- api.ts
+-- project.service.ts
+-- task.service.ts
model
+-- models.ts
+-- project.ts
+-- task.ts
api.module.ts
configuration.ts
...

Under api you will find the injectable services. The folder model contains the defined data structures. api.module.ts defines the module which can be imported into your application and configuration.ts contains the settings like API base URL.

Add the client to you project

After you copied the generated files into your project you have to import it into your app module. Also you have to add the HttpClientModule in order to use the services.

app.module.ts

@NgModule({
...
imports: [
...
HttpClientModule, // required by ApiModule
ApiModule // generated code from SwaggerHub
],
...
bootstrap: [AppComponent]
})
export class AppModule {
}

Normally it shouldn't be necessary to edit the generated client code. But after running the project you might see following error when running the project:

Angular Compile Error

The solution for this error I found on Stackoverflow (https://stackoverflow.com/questions/49840152/angular-has-no-exported-member-observable) Turns out beginning with rxjs 6+ the import lines for Observable changed a little bit. So one solution is to go into your *.service.ts files and change the lines

import { Observable } from 'rxjs/Observable'; // wrong
import { Observable } from 'rxjs'; // works

or install the package rxjs-compat

npm install rxjs-compat --save

The last thing you might want to change is the API base URL. Running the application as it is the service will send the requests against the Swagger Mock Server. To quickly overwrite the URL you can add a new entry into your environment.ts file and provide BASE_PATH with this value:

environment.ts

export const environment = {
production: false,
base_path: 'http://localhost:8888'
};

app.module.ts

import { environment } from '../environments/environment';

@NgModule({
...
providers: [{
provide: BASE_PATH,
useValue: environment.base_path
}],
bootstrap: [AppComponent]
})
export class AppModule {
}

Using the services

The usage of the generated services is more or less the same as if you would have written them yourself. Simply inject them into your component and call the methods as defined in your specification via the operationId:

import { Component, OnInit } from '@angular/core';
import { Project, ProjectService } from '../api';

@Component({
selector: 'app-project-overview',
templateUrl: './project-overview.component.html'
})
export class ProjectOverviewComponent implements OnInit {

projects: Project[] = [];

constructor(private projectService: ProjectService) {
}

ngOnInit(): void {
this.projectService.listProjects()
.subscribe((projects: Project[]) => {
this.projects = projects;
}, (error) => {
console.log('error', error);
});
}
}

Downloading server code for Python Flask

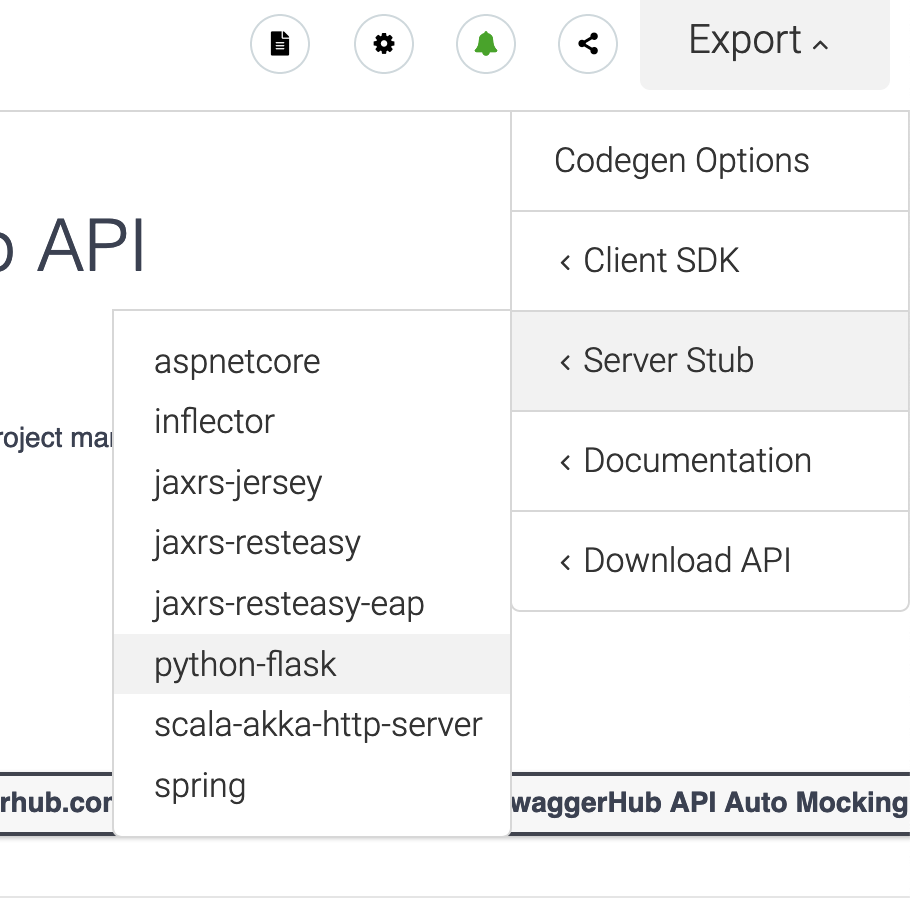
For the server code I won't go much into detail. To download it simply go to SwaggerHub and click on Export -> Server Stub -> python-flask:

Python Flask Server Stub Download

As opposed to the client code the generated server code is not ready to use out of the box. What it does is generate a ready-to-run application with the endpoints but with placeholders for the implementation:

project_controller.py

import connexion
import six

from swagger_server.models.project import Project # noqa: E501
from swagger_server import util

import connexion
import six

from swagger_server.models.project import Project # noqa: E501
from swagger_server import util


def add_project(body=None): # noqa: E501
"""adds an project

Adds a project # noqa: E501

:param body: The added project
:type body: dict | bytes

:rtype: None
"""
if connexion.request.is_json:
body = Project.from_dict(connexion.request.get_json()) # noqa: E501
return 'do some magic!'

# ...remaining endpoints...

· 3 min read
Florian Mladitsch

For my side project I'm deploying two projects (Angular Frontend and ASP.NET Core API) to a Windows Server with IIS installed. In my current setup each project is deployed automatically via TeamCity whenever I check something into the master branch.

One way to do such a deployment is to use an build server tasks that handles the deployment to IIS (e.g. via Web Deploy). What those tasks are basically doing is copying files (latest binaries of the application) to the physical path of the IIS site. If you enable more fancy options on those deployment tasks then this step might include taking the IIS site offline and/or deleting all old files prior to deployment.

The problem I had with this approach is that the application is either offline during deployment or in an inconsistent state while files are being copied to the IIS sites physical location. For my small side project I wanted to have a (nearly) zero downtime deployment in IIS.

So what I wanted to do is to copy my application binaries (that I want to serve via IIS) to an 'arbitrary' folder and then tell IIS to serve the application from this new folder after the copy job is done.

Thanks to AppCmd.exe this is actually pretty easy to achieve. AppCmd.exe allows you to manage your IIS Server via command line. A introduction and more complete documentation can be found here: https://docs.microsoft.com/en-us/iis/get-started/getting-started-with-iis/getting-started-with-appcmdexe.

The initial state of the folder structure looked something like this:

edrinks-webapp
+-- release_0
| +-- index.html
| +-- app.js

In each deployment I'm creating a new folder called release_x where a simple task is copying the application into it while increasing a counter (handled by TeamCity variables):

edrinks-webapp
+-- release_0
| +-- index.html
| +-- app.js
+-- release_1
| +-- index.html
| +--app.js

After the files have been copied I call AppCmd.exe to change the folder from where the IIS page is served from:


C:\Windows\System32\inetsrv\appcmd.exe set vdir "E-Drinks/" -physicalPath:"edrinks-webapp\release_1"

vdir "E-Drinks/" identifies the application name given in IIS and -physicalPath:"..." is the actual location on the hard drive.

This process goes on for each each deployment:

edrinks-webapp
+-- release_0
| +-- index.html
| +-- app.js
+-- release_1
| +-- index.html
| +--app.js
+-- release_2
| +-- index.html
| +-- app.js
| +-- new_app.css
+-- release_x
| +-- index.html
| +-- ...

In order to prevent having too many old application versions I execute a small cleanup task which keeps the last x versions and deletes the remaining old versions. In my case this is done with following python script:

import os, sys, shutil

def cleanup(keep):
print('keep last {} versions'.format(keep))
releases = []
for item in os.listdir():
if item.startswith('release_'):
releases.append((item, os.path.getctime(item)))
releases.sort(key=lambda tup: tup[1], reverse=True)
for release in releases[keep:]:
print('removing {}'.format(release[0]))
shutil.rmtree(release[0])

if __name__ == '__main__':
if len(sys.argv) >= 2:
try:
keep = int(sys.argv[1])
cleanup(keep)
except ValueError:
print('invalid parameter: {}'.format(sys.argv[1]))
python cleanup.py 10 # number of old versions to keep

· 4 min read
Florian Mladitsch

In some Angular applications the current route (or component if you will) holds an internal state of the application. For example a entered search term and/or selected item in a list.

Internal State

With a Angular component looking something like this:

import { Component } from '@angular/core';

@Component({
selector: 'app-example-one',
templateUrl: './example-one.component.html',
styleUrls: ['./example-one.component.css']
})
export class ExampleOneComponent {
searchTerm = '';
searchOption = 1;
}

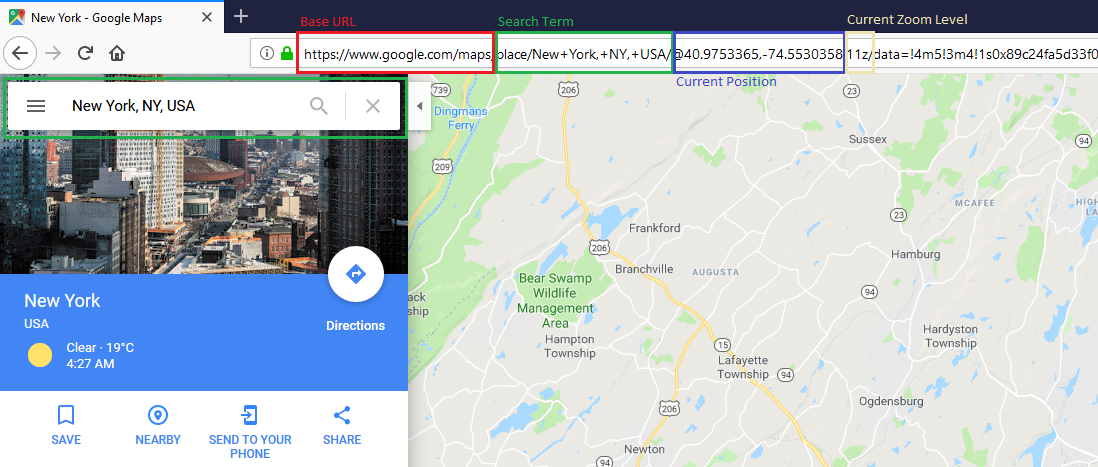
In order to not lose the state when the user refreshes the page (or wants to bookmark/share it) the current state must be persisted somewhere. While we could persist it in local storage (or session storage or cookie) this approach breaks when the user wants to share the link with another person. Instead what some applications are doing is to store the state in the URL. The URL route/query parameters are updated as you change the state of a page. On good example for this is Google Maps where the current view is encoded into the URL automatically after you change the current view.

[Google Maps Example

In Angular what I'm doing most of the time is to use the ActivatedRoute service and update query parameters in the URL more less manually after the internal state changes. Additionally during component initialization I have to read the current query parameters in order to set my internal properties (states) at startup.

import { Component, OnInit } from '@angular/core';
import { ActivatedRoute, Router } from '@angular/router';

@Component({
selector: 'app-example-one',
templateUrl: './example-one.component.html',
styleUrls: ['./example-one.component.css']
})
export class ExampleOneComponent implements OnInit {
searchTerm = '';
searchOption = 1;

constructor(private activatedRoute: ActivatedRoute, private router: Router) {
}

ngOnInit() {
if (this.activatedRoute.snapshot.queryParams['searchTerm']) {
this.searchTerm = this.activatedRoute.snapshot.queryParams['searchTerm'];
}

if (this.activatedRoute.snapshot.queryParams['searchOption']) {
this.searchOption = parseInt(this.activatedRoute.snapshot.queryParams['searchOption'], 10);
}
}

syncQueryParams() {
this.router.navigate(['.'], {
relativeTo: this.activatedRoute,
queryParams: {
searchTerm: this.searchTerm,
searchOption: this.searchOption
}
});
}
}

Component template:

<div class="form-group">
<label class="input-label">Search Term</label>
<input type="text" [(ngModel)]="searchTerm" (ngModelChange)="syncQueryParams()">
</div>

<div class="form-group">
<label>
Option 1
<input type="radio" name="searchOption" [value]="1" [(ngModel)]="searchOption" (ngModelChange)="syncQueryParams()">
</label>
<label>
Option 2
<input type="radio" name="searchOption" [value]="2" [(ngModel)]="searchOption" (ngModelChange)="syncQueryParams()">
</label>
</div>

This got me thinking if it possible and easier to use Typescript property decorators to mark those properties (that represent my internal state) and automatically synchronize the values with the URL.

Documentation about Typescript Decorator can be found here: TypeScript Decorator

I was hoping I could end up with something like the following code:

export class ExampleTwoComponent {
@UrlState() searchTerm = '';
@UrlState() searchOption = 1;
}

So, whenever this component is initialized those two properties would be set when the URL contains ?searchTerm=someSearch&searchOption=2 and when I update the properties in the view it would reflect in the URL automatically.

But at this point I ran into the problem that it is not possible to directly inject (Angular) services into my decorator because they are, after all, just exported functions. While it is completely possible to implement query parameter updates without Router and ActivatedRoute I opted for a different solution/hack I found on Stackoverflow[1] in order to inject services into a decorator.

Basically what it does is to inject the service Injector into your component and then your decorator function taps into the ngOnInit method of the component to inject its required services. The complete implementations looks something like this:

export class ExampleTwoComponent implements OnInit {
@UrlState() searchTerm = '';
@UrlState({
parseFct: val => parseInt(val, 10)
}) searchOption = 1;

constructor(public injector: Injector) {
}
}
export function UrlState(settings = {
parseFct: val => val
}): PropertyDecorator {
return function (target, propertyKey) {
let propertyValue;
let activatedRoute: ActivatedRoute;
let router: Router;

const ngOnInitUnpatched = target['ngOnInit'];
target['ngOnInit'] = function (this) {
activatedRoute = this.injector.get(ActivatedRoute);
router = this.injector.get(Router);

activatedRoute.queryParams
.subscribe((params) => {
if (params[propertyKey]) {
target[propertyKey] = settings.parseFct(params[propertyKey]);
}
});

if (ngOnInitUnpatched) {
return ngOnInitUnpatched.call(this);
}
};

function getter() {
return propertyValue;
}

function setter(value: any) {
propertyValue = value;
if (activatedRoute) {
const newQueryParam = {};
newQueryParam[propertyKey] = value;

router.navigate(['.'], {
relativeTo: activatedRoute,
queryParams: newQueryParam,
queryParamsHandling: 'merge',
replaceUrl: true
});
}
}

Object.defineProperty(target, propertyKey, {
get: getter,
set: setter,
enumerable: true,
configurable: true
});
};
}

Additionally, the decorator takes a (parser) function as parameter because when retrieving the value from the route it is returned as a string. The serialization/deserialization from and to query parameters could probably be done automatically in the decorator for primitive data types but this is just a quick and dirty proof of concept. It would be even possible to encode properties of type object into query parameters with those converter functions.


[1] https://stackoverflow.com/questions/48873883/angular-aot-custom-decorator-error-encountered-resolving-symbol-values-staticall/48875749#48875749

https://toddmotto.com/angular-decorators#creating-a-decorator